German shepherds are large and regal dogs who brand great companions. They also make great subjects for drawing studies. A german language shepherd cartoon is a fantastic way to do many of the central skills in realistic animal drawing. In this realistic german shepherd drawing tutorial, we take you through all the steps necessary to capture the details and coloring in this beloved dog. Collect your drawing supplies, go comfortable, and let us begin!
Table of Content
- i German Shepherd Cartoon Tutorial
- 1.1 Step 1: Constructing the Main Body of Your German Shepherd Sketch
- 1.two Step 2: Constructing the Head of Your German Shepherd Sketch
- ane.3 Step iii: Constructing the Cage of Your German Shepherd Drawing
- 1.iv Step 4: Constructing the Ears of Your Dog
- ane.v Step 5: Constructing the German Shepherd'south Front end Legs
- 1.half dozen Stride 6: Constructing the German language Shepherd's Back Legs
- 1.7 Step 7: Drawing the Final Outline
- i.viii Step 8: Adding the Detailing and Fur
- 1.nine Step ix: Adding the Get-go Coat of Color
- one.ten Step ten: Adding Shadows
- i.11 Step xi: Adding Highlights
- 1.12 Step 12: Calculation the Second Coat of Color
- 1.13 Step thirteen: Finalizing the Facial Details
- 1.14 Step xiv: Finishing Your Realistic German Shepherd Drawing
- ii Oft Asked Questions
- 2.one What Is the Most Hard Office of a German Shepherd Drawing?
- 2.two Tin These Instructions be Used to Draw Other Types of Dog?
German language Shepherd Drawing Tutorial
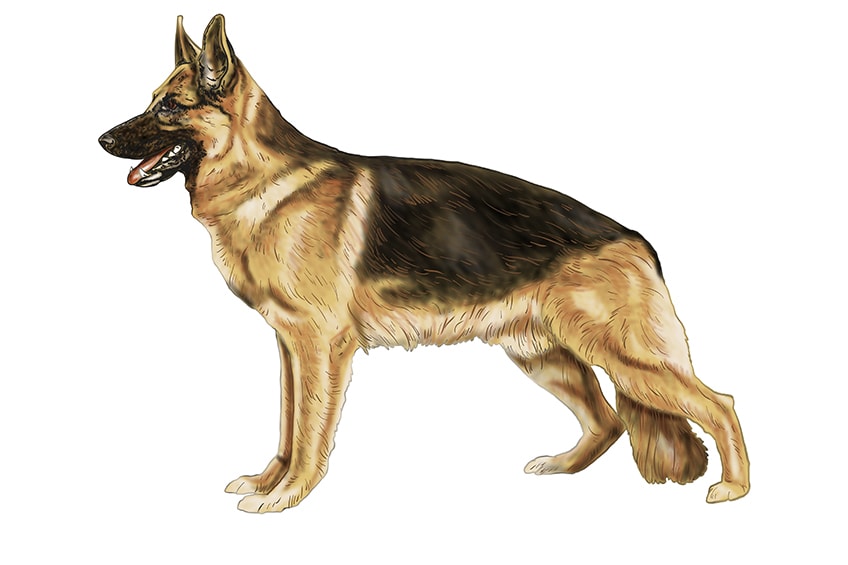
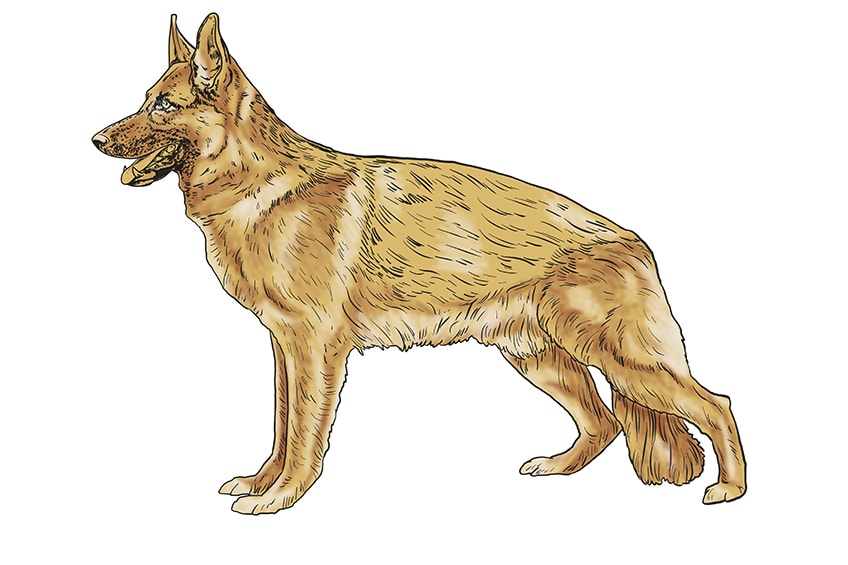
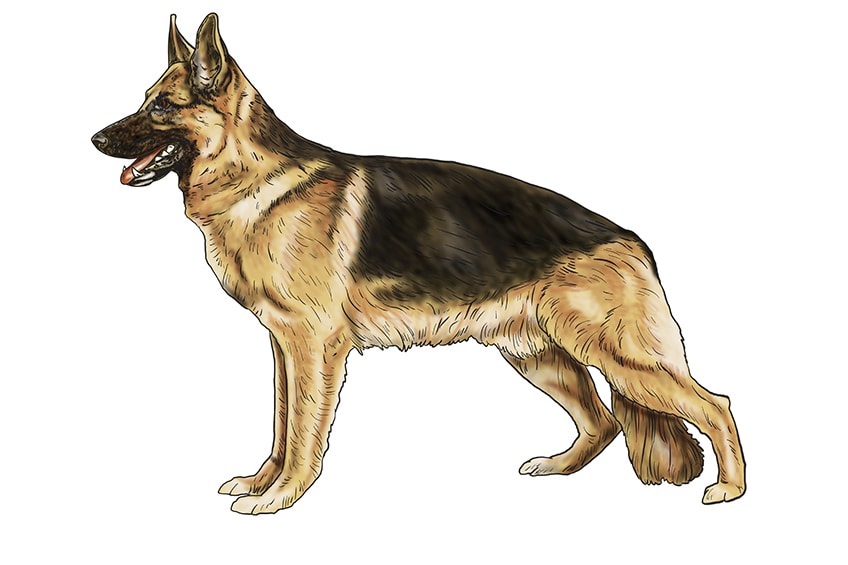
The paradigm below is the final german language shepherd sketch that you lot will achieve by the stop of this tutorial. German language shepherds have quite a unique physiology, with their sloping back legs, large ears, and long muzzle. The coloring of a german shepherd is too unlike many other dogs. Nailing these physiological and color characteristics volition guarantee yous a realistic german shepherd drawing. Every artist has their own unique style, and this should always prove through in your final product. As such, practice not wait your german shepherd sketch to look exactly like ours.
You tin can employ any medium of your pick to consummate this tutorial. Whether you use a graphic tablet, or you prefer the attraction of watercolor paint, you lot tin but adapt the instructions to adjust your techniques.
Pace 1: Amalgam the Main Body of Your German Shepherd Sketch
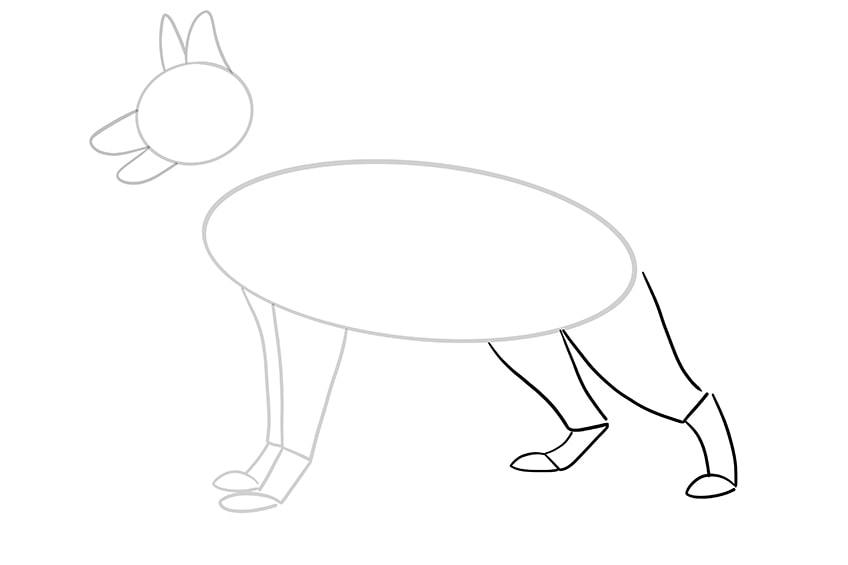
For all of our animal drawing tutorials, nosotros ever begin by using construction lines to lay down the bones shape and proportions of our brute. Beginning with the largest part of the german language shepherd, nosotros are going to use an elongated oval to correspond the chief body shape. In this very first step, you need to be enlightened of the last shape of your german shepherd sketch. The german language shepherd is facing to the left of the canvas, and every bit a result, this side of the oval should be higher than the other. This gradient volition help you blast the sloping hips in your high german shepherd drawing.
Our meridian drawing tip for this first step is to make sure that your main body construction oval is at the very center of your canvas. You volition be adding legs and a head to this oval, so y'all need plenty of space!
Step 2: Constructing the Head of Your German Shepherd Sketch
This second stride in our realistic german shepherd drawing tutorial is very uncomplicated. For the head, yous can apply a construction circle that is e'er-so-slightly oval. Place this caput circle just in a higher place the right end of the main trunk oval.
You can see on our case below that our circle is slightly oval and that information technology is angled downwardly, with one stop facing the bottom left of the canvas. This detail will help make the construction of the german shepherd's face easier downwards the line.

Footstep 3: Amalgam the Muzzle of Your German language Shepherd Drawing
If yous take another expect at the finished drawing at the peak of this tutorial, you will see that the mouth of the high german shepherd is open slightly. In this step, we are going to use construction lines to lay the foundations for this muzzle. Begin by drawing a slightly uneven "U" shape that extends from the caput circle down towards the left side of the canvas.
Showtime where this start upper "U" shape ends, draw another, smaller "U" shape to represent the bottom jaw of your german shepherd drawing.
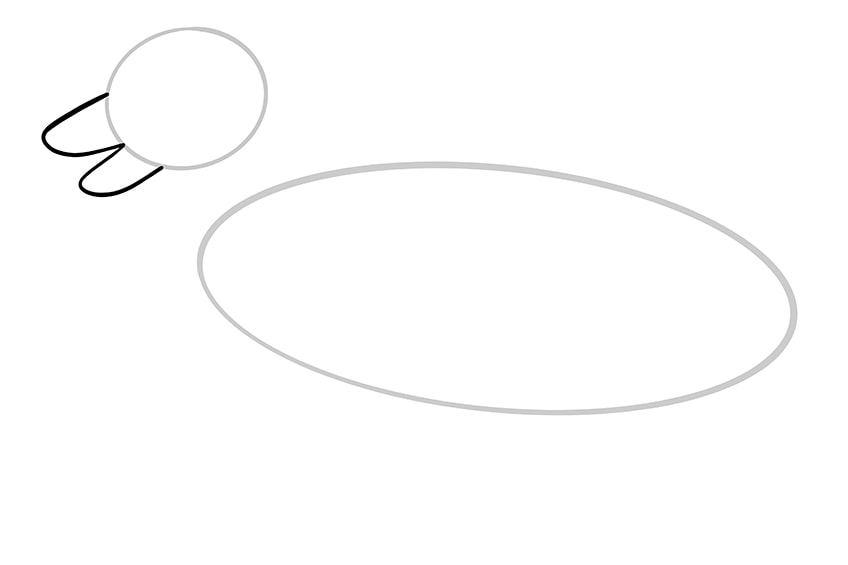
Stride 4: Constructing the Ears of Your Canis familiaris
Ane of the most characteristic features of high german shepherds is their large and upright ears. To create the basis for these ears, you lot tin use a simple curved "M" shape on peak of the head construction circle. Although drawing an "M" shape is fairly unproblematic, yous do need to pay attention to the perspective.
The ear towards the front of the head is further away from us, and information technology volition therefore be slightly narrower than the back i considering it appears smaller and because the base will be slightly hidden by the ear closest to us.

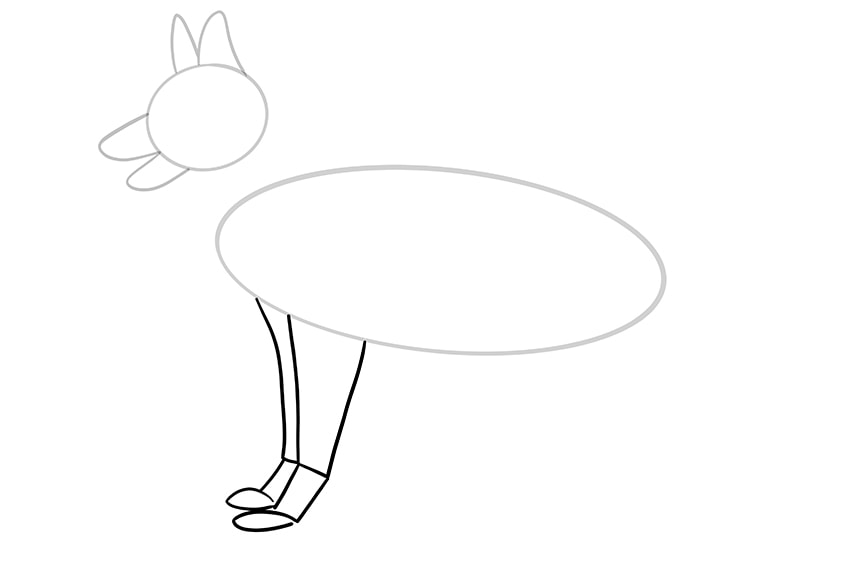
Step v: Constructing the German Shepherd's Forepart Legs
Because the german shepherd in our sketch is continuing still, the 2 front legs are fairly directly and sit side-by-side. To capture the joint for this realistic german shepherd cartoon, you are going to apply a total of six lines for the leg closest to us, and four for the back ane.
Once again, we demand to remember to consider the perspective of our drawing in this step. The leg that is closest to the left side of the sheet is further abroad from us, and information technology is therefore slightly shorter and the majority of it is hidden by the leg closest to united states.
Begin with the whole leg, which is the ane that is closest to u.s.. From almost i/5th of the way into the forepart of the body oval, draw a line that goes straight down. This line tin be slightly angled, merely not too much. Now, draw a smaller line that angles slightly towards the front of the german shepherd. To complete this leg, take another line down from the principal body at more of an bending, and then draw a matching short line.
Yous tin divide the elevation and bottom parts of the leg with a single line, then draw an oval at the finish of the leg to correspond the foot.
For the 2nd leg, just depict the far-left line that curves slightly at the top as it leaves the master body oval. depict in the joint and foot construction lines in the same fashion as you did for the other leg.
Step half dozen: Constructing the German Shepherd'due south Back Legs
The process of this stride is very similar to the previous one, except that the angles are more than farthermost and the lines can be slightly curved.
Start with the dorsum leg that is farther abroad from us, using a line that curves slightly towards the back of the canvas. Add together the ankle joint using a short line that curves towards the front of the canvass, before finishing the leg with a longer foot oval, as this foot is side-on. Complete the back lines of this leg in the same way. For the very back leg, yous can simply repeat these steps, making the leg thicker and more than curved. The ankle joint can also be less curved towards the forepart of the canvas.
At the cease of this step, you will see the german shepherd shape coming through quite clearly. In the next step, you are going to use this bones shape to create the final outline of your realistic german shepherd drawing.
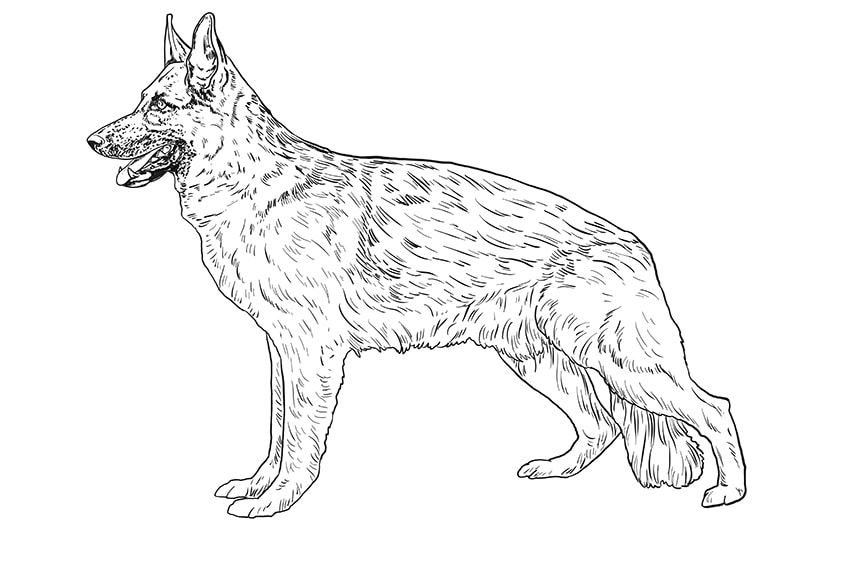
Step seven: Cartoon the Last Outline
In this stride, you can use all the previously fatigued construction lines to assist yous outline the final body of your german shepherd cartoon. Begin with the head, using a curved line to hide the ear that is furthest out, and then outlining the ears with a more than realistic shape. Add together some inner curved lines to create the inner eardrum. Add the small-scale eye detail on the side of the german shepherd's confront.
You can trace the muzzle construction lines quite closely and add a small nose patch. When you get to the lesser jaw, draw in the two large canine teeth, some back teeth, and the german shepherd's natural language.
Add some bulges to the bottom neckline, and then take this line down to the legs and paws. You can trace the legs quite closely, but employ some short strokes along the back of them to create the impression of fur. Y'all tin go on to utilise these brusque strokes to trace the belly of your german shepherd sketch into the first back leg. Utilize the same curt fur strokes to outline the front of the very dorsum thigh and adding in a fluffy tail between the back legs. Stop outlining the back legs in a single line and then take this line all the way upwards the back to join with the head.
When you are finished with this step and yous are happy with your outline, you tin can erase whatsoever of the remaining construction lines.

Step 8: Adding the Detailing and Fur
In this step, you are going to add fur detailing throughout the body of your high german shepherd sketch. Yous are also going to add detailing to your german shepherd'southward face.
Begin by calculation some shading to the lower half of the german shepherd's nostrils and below its jaw. Then, use some short strokes and dots to add together some textural shading all effectually the high german shepherd'southward mouth and muzzle. Y'all can also add some shading details to the teeth and the edge of the tongue. To create additional realism in the face of your german shepherd drawing, yous can add some shading around the eyes and in the ear curves.
To draw the fur, it is important to consider the shape of your german shepherd. You want the hairlines to flow in the same direction as the body does. For example, the hair on the cervix and back should flow downwards towards the back of the canvas. On the abdomen, tail, and back legs, you can direct the flow of the fur downwardly.
For the most realistic german shepherd drawing, make sure that the hair lengths on the head are the shortest, and equally y'all movement down the body, they should get longer.
Step nine: Adding the First Coat of Color
To become a realistic coloring for your german shepherd drawing, you need to layer up a few dissimilar shades. We begin by adding a single calorie-free base color, and then we volition add a second color coat and shading, and highlights to create depth and dimension.
For the base of operations color of your realistic german shepherd drawing, choose a light shade of brownish or caramel. You can apply this shade to color the entire torso of your german shepherd.
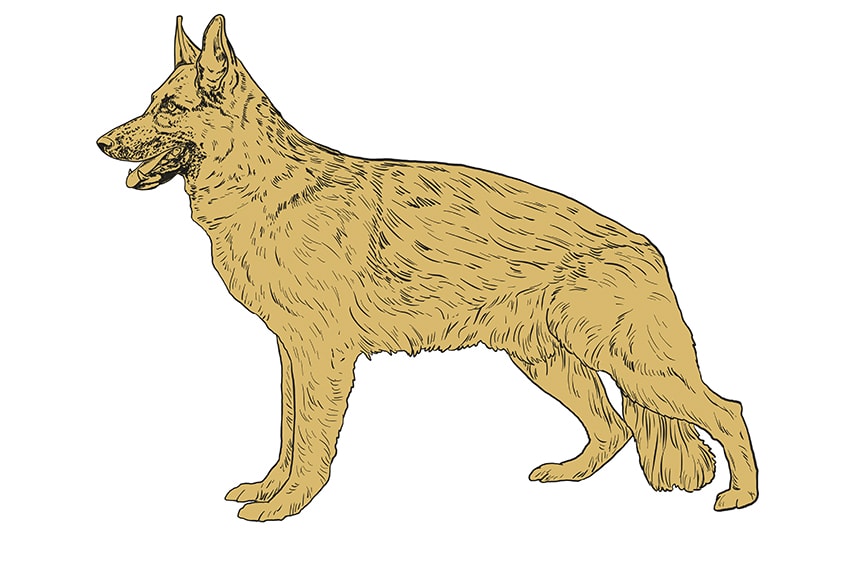
Step x: Calculation Shadows
For this stride, cull a slightly darker and warmer shade of brownish to add some shading to your high german shepherd sketch. Use this java chocolate-brown shade to create a patchy fur look around the top of the german shepherd's hips, shoulders, ears, cage, belly, and on the underside of the legs.
Step 11: Adding Highlights
The highlight shade you lot want to apply for this is a lite biscuit color. Apply a soft brush to employ this highlight around the tiptop of the ears, simply above the shoulder, along the back of the back leg, on the belly, and on the tops of the paws. Yous can also add a few patches of this highlight shade throughout the body.
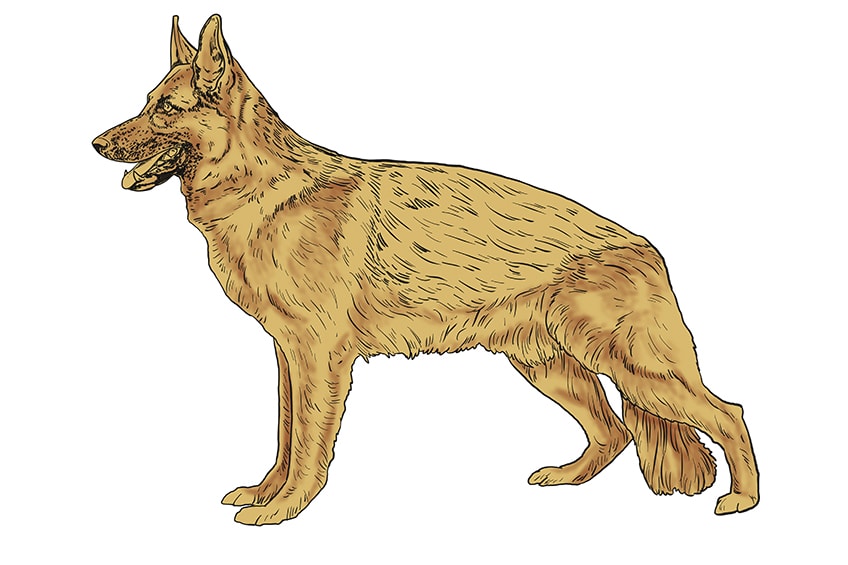
Step 12: Adding the Second Coat of Color
The second coat colour y'all are going to utilise to create your realistic high german shepherd drawing is black. Using a medium brush, add a coat of black paint around the high german shepherd's muzzle including the lower jaw. Color the nostrils with a lighter shade of grey, and employ this aforementioned greyness to add shading to the inside and outside of the ears, and around the eye.
Continue adding black forth the back of the german shepherd's spine, including the beck and back, and on the underside of the legs and tail.

Step xiii: Finalizing the Facial Details
For this concluding detailing step, y'all are going to need a shade of light red, white, and chocolate-brown. Begin by coloring the tongue with a lite shade of reddish and adding a small highlight to the side with a bear upon of white. Color all of the visible teeth with your white shade, and add together a little dot to the middle.
Finally, for the last facial detail, use your shade of chocolate-brown to color in the eyes of your high german shepherd .
Step 14: Finishing Your Realistic German Shepherd Drawing
For this very final step, you tin brand your drawing even more realistic by removing the outline and tracing over your fur strokes with your paint. Use the color that corresponds to that item part of your german shepherd, and cover any outlines or fine lines that disrupt the realism of your drawing.
Congratulations for finishing your realistic german shepherd drawing! We really hope that you take enjoyed the drawing process and that you lot are happy with your final sketch. Now that y'all know the basic process of how to draw a german shepherd, you lot can modify the tutorial to describe other types of dogs.
Frequently Asked Questions
What Is the Nigh Difficult Part of a German Shepherd Cartoon?
On the whole, this german shepherd sketch tutorial is adequately straightforward. The most time-consuming and detail-oriented phase is the detailing of the face and fur throughout the body, but in this tutorial, we intermission the process downwardly into very manageable steps.
Tin can These Instructions be Used to Draw Other Types of Dog?
Admittedly, you tin certainly change parts of this german shepherd drawing tutorial to assistance you draw other types of dogs. German language shepherds practice have a quite specific anatomy, in particular their sloping dorsum hips, so y'all will accept to exist aware of and account for this in your modifications.
DOWNLOAD HERE
How to Draw a German Shepherd Realistic TUTORIAL
Posted by: tedfortionoot.blogspot.com


Comments
Post a Comment